Building a Second Brain with Raspberry Pi, FileBrowser and Trilium
Introduction
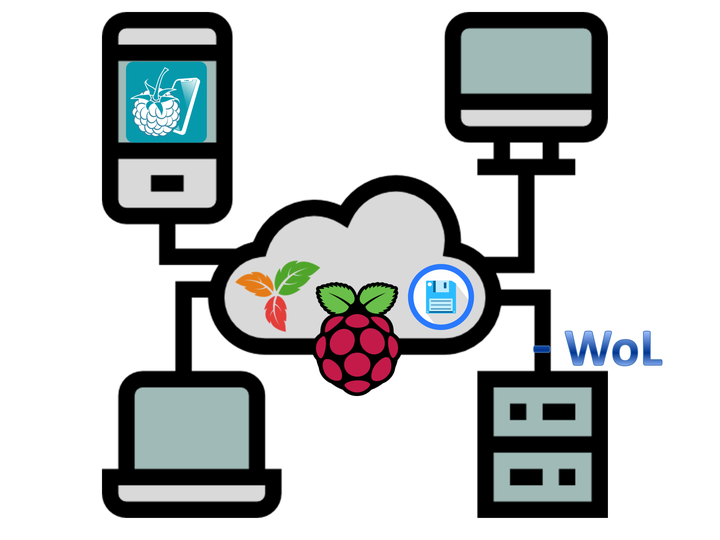
As outlined in my initial post on the Second Brain methodology, my objectives for this Raspberry Pi Second Brain are to:
- solve the dynamic DNS (I have dynamic IP and needs to be updated in Cloudflare API; otherwise the Raspberry Pi won’t be reachable through the internet)
- power on my other bigger Server through Wake-On-Lan by ethernet
- host my Personal Cloud with file system in browser using FileBrowser
- host my Notes App with UI in browser using Trilium
We will use very light-weight software with server-specific manual installations. If you have a more powerful server, I suggest going for the dockerized solutions for DDNS updating, FileBrowser and Trilium, which are much simpler and maintainable.
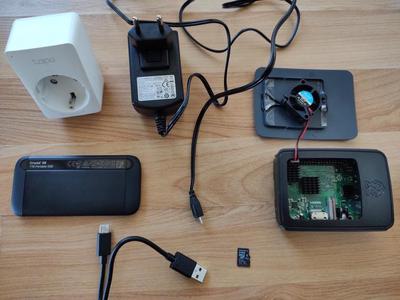
If you haven’t read my previous post on the topic,start there. Here is what you need in terms of hardware:
- Raspberry Pi (I am going with 3B+ but 4 is even better; I installed some radiators and a 5v fan on it)
- microSD card for Raspberry Pi (64GB, anything above 8GB should do)
- Power Supply for Raspberry Pi (0.5A is good)
- External SSD with USB Type-A
- Smart Plug with Mobile App (this is a TP-LINK Tapo P100, but any would do)
1. Prep Raspberry PI
1.1. Install Fan and Radiators on RP
This RP will be running all day long so cooling is important. Follow these instructions or this video tutorial to install a 5v fan on the RP. Remember that this type of fan will spin while having a power supply, regardless if RP is shutdown. This is where a smart plug comes in handy: when you turn the power on, both RP and fan start up, and after shutting down the RP you can turn the plug off to stop the fan. However, do not use the smart plug to turn power off before safely shutting down the RP as this can lead to the corruption of its microSD card.

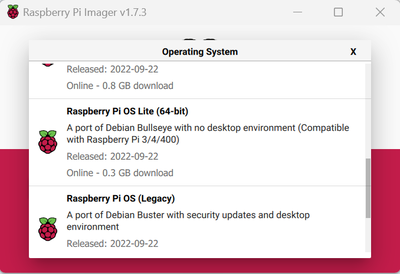
1.1. Install Raspberry Pi OS on microSD
We are going for a very light weight Second Brain, so burn the headless light OS, Raspberry Pi OS 64-bit Lite, on the microSD using the RP Imager.
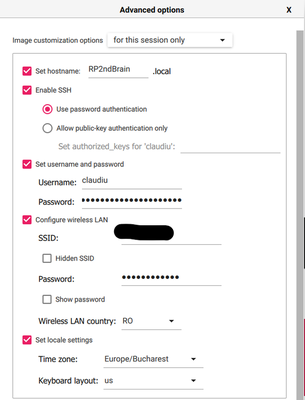
When using Raspberry Pi Imager to install Raspberry Pi OS 64-bit Lite on the microSD card be sure to:
- Set host name
- Enable SSH with username and password
- Configure Wifi for your network with SSID and password, Wifi country
- Set local settings
1.2. Raspberry Pi Setup
This RP has only 1GB of RAM, so we will increase Swap space. Also, we will want to use an external SSD drive as the main storage for our Second Brain.
1.2.1. Increase SWAP space
After booting the RP and sudo apt update, sudo apt upgrade, increase SWAP space to 1GB following this turorial
sudo dphys-swapfile swapoff  # stop the operating system from using the current swap file
sudo nano /etc/dphys-swapfile  # modify the swap file configuration file

# CONF_SWAPSIZE=1024
# then save and exit with Ctrl + X, Y, Enter

sudo dphys-swapfile setup # delete the original swap file and recreate it to fit the newly defined size
sudo dphys-swapfile swapon # start the operating systems swap system
sudo reboot
free     # check swap size
1.2.2. Mount SSD
Plug in the external SSD and mount it following this turorial
df -h     # find out the filesystem name for the drive we want to mount
lsblk     # list block devices
sudo blkid /dev/sda1  # get UUID of SSD (for me file system "/dev/sda1", UUID: "A3C7-7623", type "exfat")

# depending on SSD file format:
# sudo apt install ntfs-3g  # for NTFS
sudo apt install exfat-fuse  # for exFAT first package
sudo apt install exfat-utils # for exFAT second package

sudo mkdir -p /mnt/ssd
sudo chown -R claudiu:claudiu /mnt/ssd
sudo chmod -R 777 /mnt/ssd   # give permission to everyone
sudo nano /etc/fstab

# UUID=A3C7-7623 /mnt/ssd exfat uid=claudiu,gid=claudiu,defaults,auto,user,rw,nofail,noatime 0 0
# then save and exit with Ctrl + X, Y, Enter

sudo umount /dev/sda1   # in case the drive was automatically mounted
sudo mount -a
df -HP -t exfat     # check mount point for specific filesystem type
sudo reboot
2. Static IP & port forwarding
We will use port 22 to SSH into the RP from PC and RaspController. For security reasons we will setup external ports to some odd values (the ones quoted here are not the ones I acctually used). When in doubt, you can follow this tutorial
- 2.1. Set fixed IP for RP on router (in my case it’s
192.168.0.3, while192.168.0.2is my larger Server) - 2.2. Port forwarding on router
|-> external port 33330 -> port 22 of RP (for SSH)
|-> external port 33331 -> port 33331 of RP (for FileBrowser app)
|-> external port 33332 -> port 33332 of RP (for Trilium app)
3. Setup RaspController
Read the official documentation and follow these instructions to install the Android App and connect to the RP from your phone using SSH. Every thing is straightforward and after connecting, RaspController will install all the necessary libraries on your RP. This step assumes you connect using you local network (local static IP), but after solving the dynamic DNS with Cloudflare you access it by using a subdomain pointing to your public IP.
4. Solve dynamic DNS (DDNS)
I already wrote an in-depth post on using a Dynamic DNS IP updater bash script for Cloudflare API. Just follow the same instructions to adapt the bash script and use crontab to automate it. The only difference is that you want a Cloudflare CNAME subdomain (e.g. raspberry.psychlab.eu) pointing to my TDL domain (e.g. psychlab.eu) that needs to be unproxied (i.e. grey icon) for SSH to work.
5. FileBrowser
Follow the official installation documentation and this tutorial.
Installation
# Install
curl -fsSL https://raw.githubusercontent.com/filebrowser/get/master/get.sh | bash

# Fast run
# filebrowser -p 3331 -a 192.168.0.3 -r /mnt/ssd    # bring it up and close it by exiting shell
Make a config file for your settings:
# Make json file for config
sudo touch /home/claudiu/filebrowser.json
sudo chmod +rw /home/claudiu/filebrowser.json
sudo nano /home/claudiu/filebrowser.json

{
  "port": 33331,
  "baseURL": "",
  "address": "192.168.0.3",
  "log": "stdout",
  "database": "/home/claudiu/filebrowser.db",
  "root": "/mnt/ssd"
}
# then save and exit with Ctrl + X, Y, Enter

# Run
filebrowser -c /home/claudiu/filebrowser.json    # bring it up and close it by exiting shell
Then go to http://localhost:port (e.g.192.168.0.3:3331) and change default username (
6. Trilium
Install nodejs and then manully install Trilium.
node --version # check your node version (node.js needs to be installed)

# if not installed run the following to install:
# sudo apt update
# sudo su
# curl -fsSL https://deb.nodesource.com/setup_lts.x | sudo -E bash -
# sudo apt install nodejs
# node --version

# install dependencies
sudo apt install libpng16-16 libpng-dev pkg-config autoconf libtool build-essential nasm libx11-dev libxkbfile-dev
sudo apt install git

# install trilium
su claudiu
git clone -b stable https://github.com/zadam/trilium.git
cd /home/claudiu/trilium/
npm install    # download all node dependencies
npm rebuild
cd bin
ls             # make sure the better-sqlite3 binary is there

# Config
cp config-sample.ini config-sample-cp.ini
nano config-sample.ini
# port=33332

# Make Trilium Data directory on SSD
# trilium-data typically stored in /home/claudiu/.local/share
mkdir /mnt/ssd/trilium-data

# Run
TRILIUM_DATA_DIR=//mnt/ssd/trilium-data TRILIUM_ENV=dev node src/www

# If you need to kill it
# ps aux | grep node   # Get PID
# kill -9 <PID>
Then go to http://localhost:port (e.g.192.168.0.3:3332) and add your info.
6. Maintain uptime for apps with crontab
We will use bash files to periodically check if FileBrowser and Trilium are running and launch them if they aren’t already running.
Make the files:
cd /home/claudiu/
mkdir logs
cd /home/claudiu/scripts/
touch /home/claudiu/scripts/start_filebrowser.sh
touch /home/claudiu/scripts/start_trilium.sh

nano /home/claudiu/scripts/start_filebrowser.sh
nano /home/claudiu/scripts/start_trilium.sh
Paste in the Bash scripts inspired by this post.
For start_filebrowser.sh:
#!/bin/bash
# Run Filebrowser if not running

LOG="/home/claudiu/logs/filebrowser.log.`date +%d%m%Y`"

echo "Delete log files older than 9 days" >>$LOG
                /usr/bin/find /home/claudiu/logs/filebrowser.log.* -type f -mtime +9 -exec rm -v {} \;

echo "`date`" >>$LOG


FILEBROWSER=`ps -s |grep  'filebrowser -c /home/claudiu/filebrowser.json' | wc -l`
echo "$FILEBROWSER"

 if [ $FILEBROWSER -gt 1 ]
        then
               echo "running"

        else
                echo "not running"
                /usr/local/bin/filebrowser -c /home/claudiu/filebrowser.json
 fi
echo "Finish `date`" >>$LOG
For start_trilium.sh:
#!/bin/bash
# Run Trilium if not running

LOG="/home/claudiu/logs/trilium.log.`date +%d%m%Y`"

echo "Delete log files older than 9 days" >>$LOG
                /usr/bin/find /home/claudiu/logs/trilium.log.* -type f -mtime +9 -exec rm -v {} \;

echo "`date`" >>$LOG


TRILIUM=`ps -s |grep  'node src/www' | wc -l`
echo "$TRILIUM"

 if [ $TRILIUM -gt 1 ]
        then
               echo "running"

        else
                echo "not running"
                cd /home/claudiu/trilium/
		TRILIUM_DATA_DIR=//mnt/ssd/trilium-data TRILIUM_ENV=dev node src/www
 fi
echo "Finish `date`" >>$LOG
Set the Cron job (running every 2 minutes):
chmod +x /home/claudiu/scripts/start_filebrowser.sh
chmod +x /home/claudiu/scripts/start_trilium.sh

sudo crontab -l                               # list root cron jobs
sudo crontab -e                               # sudo is important here because we want to define the user-specific crontab for root
# pick text editor (press 1 for nano)
# edit so that bash script is ran at startup:
*/2 * * * * /bin/bash /home/claudiu/scripts/start_filebrowser.sh
*/2 * * * * /bin/bash /home/claudiu/scripts/start_trilium.sh
# then save and exit with Ctrl + X, Y, Enter

sudo crontab -l                               # check that changes were made
sudo systemctl restart cron                   # cron needs not be restarted whenever a crontab file is modified
sudo systemctl status cron                    # check that the task has been run successfuly

sudo reboot
7. Setup Wake on Lan on Server
These settings are necessary on a Ubuntu machine if you want to be able to switch it on remotely (needs only to have power supply) using RaspController. You will connect to RP using RaspController and from this app send a WoL magic package to the Server to wake it up. You only need to have the RP connected to the Server with Ethernet cable and know the mac address of the Server. You can find a tutorial in this post.
Do these on the Ubuntu machine:
ip a

sudo apt install ethtool -y
sudo ethtool enp6s0  # find out if the network card supports WoL
sudo ethtool -s enp6s0 wol g  # enable WoL on network card
For me (top Ethernet port) Mac address is fc:34:97:67:d8:1a and enp6s0 is the computer’s network interface name.
Make sure that WoL is always activated when the server is restarted (I didn’t need to do this because it was already activated from start). You can create systemd service to make sure it always is:
sudo --preserve-env systemctl edit --force --full wol-enable.service

# Copy and paste this in
[Unit]
Description=Enable Wake-up on LAN

[Service]
Type=oneshot
ExecStart=/sbin/ethtool -s enp6s0 wol g

[Install]
WantedBy=basic.target
# then save and exit with Ctrl + X, Y, Enter

sudo systemctl daemon-reload
sudo systemctl enable wol-enable.service
systemctl status wol
In RaspController you can set the Mac address and push “Wake” that is equivalent with the command sudo wakeonlan fc:34:97:67:d8:1a and will send magic packet to 255.255.255.255:9 with fc:34:97:67:d8:1a.
If it doesn’t work, remember that Wake-on-Lan needs to be supported by motherboard and enabled in BIOS (e.g. “Power On by PCI-E” settings for ASUS mobo).