HomeLab 2: Web domain, subdomains and Dynamic DNS with Cloudflare API
1) Have a Top Level Domain (TLD)
I have the TLD psychlab.eu, which I bought from Namecheap.
You should pay attention to the idiosyncratic renewal procedures and redemption period for these TLDs (.eu ones included) and other gTLDs, as well as special terms and conditions. You can find some info about it from Namecheap here and here.
Next we will be using Cloudflare for DDNS IP updating so it’s a good idea to check the cloudflare’s TLD Policies. Keep in mind that free TLDs, such as .ml, .ga., .tk, .cf, and .gq, are not applicable for Cloudflare dynamic DNS automation.
Subdomains can be created at the service that manages your domain’s DNS settings. Usually, this is your web host, but it can also be your domain registrar, depending on your configuration.
Some of the subdomains I am interested in:
www. - yes, this is a subdomain and it can help with SEO
claudiu. - for my blog
docs. - for basic documentation
guac. - for Apache Guacamole
rserv. - for RStudio Server
survey. - for LimeSurvey
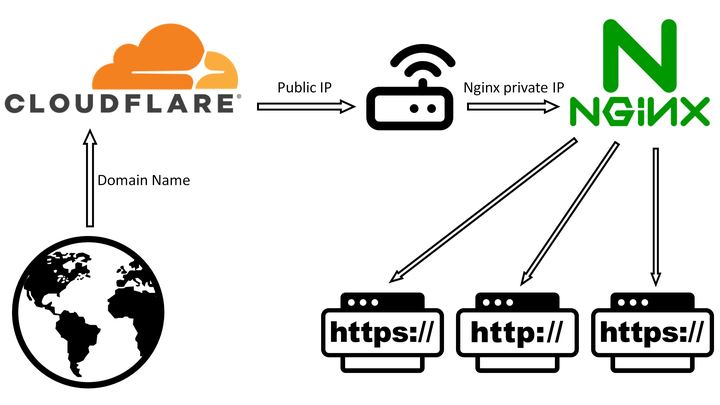
2) Use Cloudflare
Cloudflare free account provides security (not exposing server public IP, DDoS mitigation etc.), fastest DNS resolver, very fast load time (they have a fast global CND) and SSL certificates (but I won’t be using them here because you have to update them manually each year; we will later tackle SSL certificates with auto-renewal using letsencrypt and certbot).
- Register a free cloudflare account
- Add domain name to cloudflare
- To finish step 2 you also need to change nameservers from registrar to cloudflare (e.g. for namecheap ns change); cloudflare will inform you what the ns’ names should be, [more info from cloudflare on this] (https://developers.cloudflare.com/dns/zone-setups/full-setup/setup/).
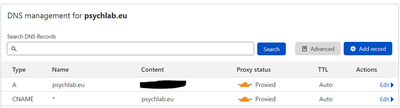
Subdomain records can be created in Cloudflare app. Better yet, we will just define a wildcard for all subdomains (this also makes SSL easier since we issue only one SSL certificate for TLD and subdomains).
A wildcard is a catch-all subdomain that lets you create tons of subdomains without having to manually set up each one (e.g. so that each site you host can get its own subdomain). A wildcard subdomain is represented by an asterisk <*.yoursite.com>.
Cloudflare now provides free proxied wildcard. Just define CNAME * record and point it to main domain.
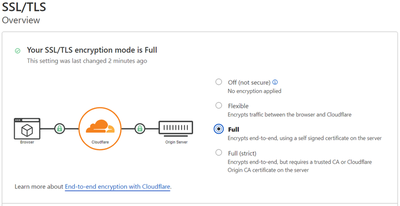
Two additional security settings in Cloudflare that are very useful:
- Full end-to-end encryption (to activate it in the Cloudflare dashboard go to
SSL/TLS > Overview)
- Redirect “http” to “https” (to activate it in the Cloudflare dashboard go to
SSL/TLS > Edge Certificates)

3) Records pointing to an “outside” domain name (not server IP)
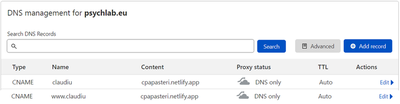
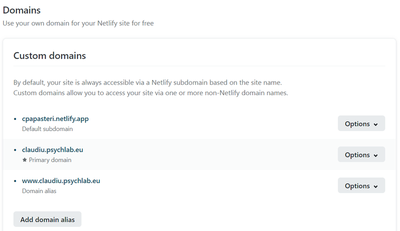
I have a blog deployed by Neflify cpapasteri.netlify.app.
I want claudiu.psychlab.eu to point to cpapasteri.netlify.app.
A more detalied guide on this can be found in this blog post.
- in Cloudflare:
make a
CNAMEDNS record in cloudflare DNS dashboard,set it on “DNS only” (not Proxied),
give it a Name (I named my blog subdomain “claudiu”),
and set it to point (Content field) to the absolute URL of the Netlify site.
After doing this for subdomain, don’t forget to to the same for www.subdomain.
- in Netlify:
go to Domains of your site
add a custom domain and add the subdomain from cloudflare DNS (for me its “claudiu.psychlab.eu”)
The same should be done for subdomain (Primary) and www.subdomain (Alias).
4) Use a Dynamic DNS IP updater bash script for Cloudflare API
You can find a great video tutorial on this from NetworkChuck.
- Clone this repo from K0p1-Git. It contains a pure bash script.
- Adapt the script
cloudflare.sh
Everything you need is in the cloudflare site page, including zone ID and token/global key (I used global key).
The script can be used to update IP for main domain record or subdomain record (all of which can be defined in Cloudflare app) - I will use it for the main domain, as I already have wildcard records pointing to it.
The only thing you should chose is wether you want this registry to be “Proxied” and “DNS Only”. This forum post describes the difference. The DNS proxied means it will be shown a Cloudflare IP if you look it up. Thus all attacks at that domain will DDoS Cloudflare and not you host directly. Non-proxied means all traffic goes directly to your own IP without Cloudflare being a safety net in front. The upside of proxied is that you will enjoy the Coudflare benefits, but you can not make a direct connection to your IP, which means any custom ports wont work. Non-proxied has the advantage of being able to use custom ports to connect as it will connect to your IP directly.
# dpkg -s git                                 # check if git is installed
# sudo apt update && sudo apt install git -y  # install git if not installed

mkdir $HOME/scripts                           # make a directory for scripts inside $HOME (aka /home/<your-username>/)
cd $HOME/scripts

git clone https://github.com/K0p1-Git/cloudflare-ddns-updater.git
cd cloudflare-ddns-updater
cp cloudflare-template.sh cloudflare.sh       # copy the template as cloudflare.sh
nano cloudflare.sh                            # addapt cloudflare.sh
# here edit: auth_email, auth_method, auth_key, zone_identifier, record_name with info from cloudflare
# pick proxy="true" or proxy="false" if you want "Proxied" or "DNS Only" - I picked Proxied

chmod +x cloudflare.sh                        # to make sure bash script is executable

# we will not run the bash script here, because it will be run by Cron and this way it's easier to test that both the script and cron job are working properly
# ./cloudflare.sh                             # execute script in a subshell - if ran you can check the cloudflare dashboard to make sure the IP was changed
5) Automate the updating task with Cron Job
We will use cron to run the bash script (as root) every 10 minutes.
# dpkg -s cron                                # check if cron is installed, it usually always is
# sudo apt update && sudo apt install cron    # if by any change cron is not installed
# sudo systemctl enable cron                  # if you installed it, make sure it's set to run in the background too

# dpkg -s curl                                # check if curl is installed
# sudo apt install curl                       # curl is needed for the bash script

sudo crontab -l                               # list root cron jobs
sudo crontab -e                               # sudo is important here because we want to define the user-specific crontab for root
# pick text editor (press 1 for nano)
# edit so that bash script is ran every 10 minutes:
# */10 * * * * /bin/bash /home/claudiu/scripts/cloudflare-ddns-updater/cloudflare.sh
# save and exit

sudo crontab -l                               # check that changes were made
sudo systemctl restart cron                   # cron needs not be restarted whenever a crontab file is modified
sudo systemctl status cron                    # check that the task has been run successfuly

# check the cloudflare dashboard to make sure the IP was changed