HomeLab 3: Install and configure Apache Guacamole as Docker Container
Reason
Guacamole is an HTML5 web application that provides access to a desktop environment using remote desktop protocols.
There are multiple easy to use all-in-one Docker images for Guacamole, but most are not maintained. Here we will use only official images for our installation of Apache Guacamole with out-of-the-box working TOTP Authentication (Time-based one-time password, a common easy to use 2FA method). Furthermore, most tutorials don’t touch on all prerequisites necessary for a VNC connection using Guacamole, while others present overly complicated VNC Server setups. Here we will mostly use Ubuntu’s out-of-the-box software, keeping all settings simple but also secure. We will also setup SFTP for file transfer through Guacamole.
Steps:
(1) We will need to assign a static IP address to the Ubuntu machine (this will be needed for the VNC connection).
(2) We will define a new user without sudo privileges to be used for remote access login through guacamole VNC connection. After, we will take care of several Ubuntu settings that are prerequisites for establishing the VNC connection.
(3) We will enable Remote Desktop/Legacy VNC Protocol (on Ubuntu 22.04 LTS we don’t even need to install and configure a VNC server to establish a VNC connection).
(4) We will will setup SFTP for file transfer through Guacamole.
(5) We will install Docker and Docker Compose.
(6) We will install Guacamole through Docker Compose.
(7) We will cover basic administration and VNC connection setup.
1. Set Static IP address on router
You may set the static IP directly on the Ubuntu machine (here is a post discribing how), but if you do this you will also need to block this IP in the router so it does not get assigned to other devices. Consequently, we are better off just setting the static IP for our Ubuntu machine in the router.
To do this go to the settings page of your router (e.g. for my router it’s http://192.168.0.1/) and use your admin user and password to log in. A more detailed guide to setting static IP addresses on the router can be found here.
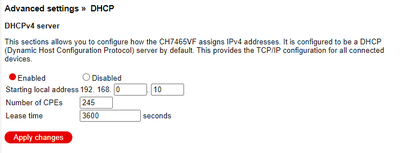
I set my static IP using the DHCP. On my router the path is: DHCP > Reserved IP; after check that the router assigns IPs within a range that does not include the static IP you just assigned. For example, I set my static IP to 192.168.0.2, while the router starts to assign addresses starting with 192.168.0.10.

2. Create a user for VNC authentification and change Ubuntu settings
Create the user
Create a system user for VNC from which the connection will be made. You can find all steps in this blog post.
Create a new user and set a password (mine is named vncuser):
sudo apt update

sudo adduser vncuser    # will ask to set password for this user

# sudo su - vncuser     # switch to the user you created
Prepare Ubuntu Desktop 22.04 LTS for Remote Login
Do the following for for vncuser:
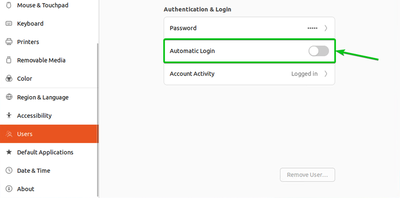
Enabling Automatic Login
(1) Click on Settings from the system tray
(2) From the Users section, click on Unlock
(3) Type in your login password and click on Authenticate
(4) Toggle on the Automatic Login toggle button to enable automatic login
Disable Screen Blanking and Automatic Screen Lock
(1) Click on Settings from the system tray
(2) Click on Privacy
(3) From the Screen section, you can configure Blank Screen Delay and Automatic Screen Lock
(4) Set the Blank Screen Delay to Never from the dropdown menu. Disable automatic screen lock by toggeling the Automatic Screen Lock button off. (For my setup I set all of these off.)
![]()
The way my setup will work is that vncuser, a user without sudo permission will be always logged in on the host and will be used for the VNC connection through Guacamole. After gaining desktop remote access through Guacamole, the admin could switch to another user that is in the sudo group.
Disable default keyring password
In Ubuntu 22.04, all the username and passwords for your system are, by default, encrypted with your username’s password. That is being stored in a keyring. When rebooting, the VNC server is being loaded without the keyring being unlocked and therefore can’t access the stored VNC password (as its encrypted) so it auto generates a new one each time you boot up (you will see these changing passwords in Settings > Sharing > Remote Desktop). So, if you auto boot up with your user login, during the auto boot up, Ubuntu 22.04 doesn’t automatically unlock the keyring. What we will do is remove the passward for the default keyring of vncuser. Here is a walkthrough blog post:
(1) Open up the Activites menu and search for “keyring”. Open the “Passwords and Keys” application that shows up in the search results.
(2) In the keyring application, right click on the Login to the left, and click on Change Password.
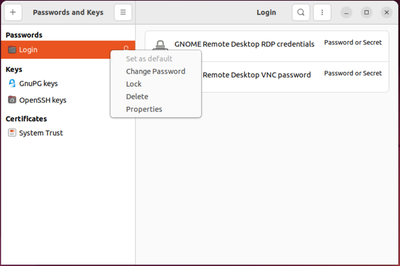
(3) Authenticate with the keyring by using your current password. (4) Leave the password fields blank and simply click Continue.
3. Enable Remote Desktop and Legacy VNC Protocol
The GNOME desktop environment that comes with Ubuntu Desktop 22.04 LTS uses the Vino VNC server to implement the Screen Sharing function.
Be sure to make these following settings for the vncuser user we just created.
Enable Screen Sharing/Remote Desktop on Ubuntu 22.04 LTS
The steps provided here.
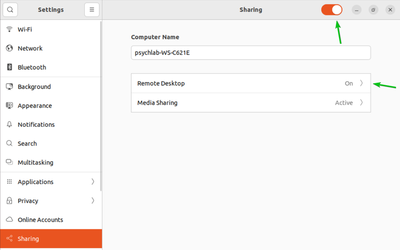
From Settings > Screen Sharing:
toggle Sharing button on
Remote Desktop on
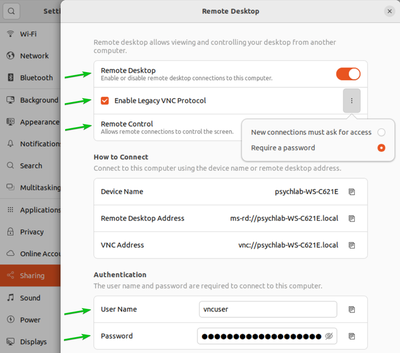
- Remote Desktop on
- Enable Legacy VNC Protocol (pick ‘Require a password’)
- Remote Control on
- Set User and Password for Authentication (use
vncuseruser)
Change VNC auth method to use password instead of prompt
When using the screen sharing VNC connection on Ubuntu 22.04, we by default always get the prompt on the host computer to allow the connection; this defeats the purpose of remote access. I used the dconf-editor to modify the settings so that we don’t get the prompt on the host when trying to connect from a remote device.
sudo apt install dconf-editor # do this as administrator
sudo su - vncuser # switch to the vncuser you created; it is important to do this on vncuser account
dconf-editor
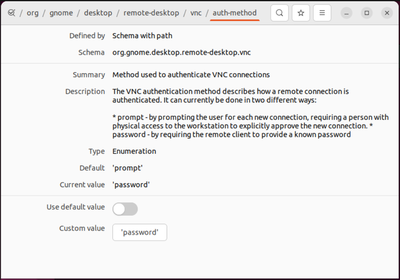
# go to /org/gnome/desktop/remote-desktop/vnc/auth-method
From /org/gnome/desktop/remote-desktop/vnc/auth-method change auth-method from ‘prompt’ to ‘password’. Then click Apply.
4. Install SSH daemon and setup SFTP
We will use SFTP for file sharing through Guacamole. For this we need to install SSH and setup SFTP as described in this blog post:
- If SSH server is not already installed on your system, install it.
sudo apt update
sudo apt install ssh
- Once SSH is installed, we need to make some changes to the SSHD configuration file.
sudo nano /etc/ssh/sshd_config
Scroll to the bottom of the file and add the following 5 lines at the very end:
# Match Group sftp             # this line gives me an error, I omited it and didn't use groups
ChrootDirectory /home
X11Forwarding no
AllowTcpForwarding no
ForceCommand internal-sftp
HostKeyAlgorithms=ssh-rsa,ssh-rsa-cert-v01@openssh.com
PubkeyAcceptedAlgorithms=+ssh-rsa,ssh-rsa-cert-v01@openssh.com
The lines above will allow users in the sftp group to access their home directories via SFTP, but denies them normal SSH access, so they can never access a shell. After pasting those lines, save and close the configuration file.
Guacamole only supports ssh-dss and ssh-rsa, and both have been disabled in Ubuntu.
A workaround is adding “HostKeyAlgorithms=ssh-rsa” to the end of /etc/ssh/sshd_config on the Ubuntu machine and restart sshd.
- Restart the SSH service for these new changes to take effect:
sudo systemctl restart ssh
Check status:
sudo systemctl status ssh
- Create
sftpgroup and add thevncuserto the group.
This step is optional and I dind’t do it because Match Group in sshd_config gives me an error.
# sudo addgroup sftp

# sudo usermod -a -G sftp vncuser
- If you have a firewall, set a rule to allow port 22:
sudo ufw allow ssh

sudo ufw enable && sudo ufw reload
- Test it from same machine:
sftp vncuser@127.0.0.1    # type 'yes' and type the password
bye                       # close the sftp connection
5. Install Docker and Docker Compose
Follow official documentation.
1. Set up the repository
Update the apt package index and install packages to allow apt to use a repository over HTTPS:
sudo apt update
sudo apt install ca-certificates curl gnupg lsb-release
Add Docker’s official GPG key:
sudo mkdir -p /etc/apt/keyrings
curl -fsSL https://download.docker.com/linux/ubuntu/gpg | sudo gpg --dearmor -o /etc/apt/keyrings/docker.gpg
Use the following command to set up the repository:
echo \
  "deb [arch=$(dpkg --print-architecture) signed-by=/etc/apt/keyrings/docker.gpg] https://download.docker.com/linux/ubuntu \
  $(lsb_release -cs) stable" | sudo tee /etc/apt/sources.list.d/docker.list > /dev/null
2. Install Docker Engine
Update the apt package index, and install the latest version of Docker Engine, containerd, and Docker Compose.
sudo apt update
sudo apt install docker-ce docker-ce-cli containerd.io docker-compose-plugin
Verify that Docker Engine is installed correctly by running the hello-world image:
sudo docker --version
sudo docker run hello-world
Some people may experience problems installing Docker Compose (I didn’t). Here is how to install it if you cant into trouble with official installation guide. Furthermore, docker compose command may not work after this installation if you don’t set permissions:
# curl -sL "https://github.com/docker/compose/releases/download/1.29.2/docker-compose-$(uname -s)-$(uname -m)" -o /usr/local/bin/docker-compose

# sudo chmod +x /usr/local/bin/docker-compose
Verify that the Docker Compose installation was successful:
docker compose version
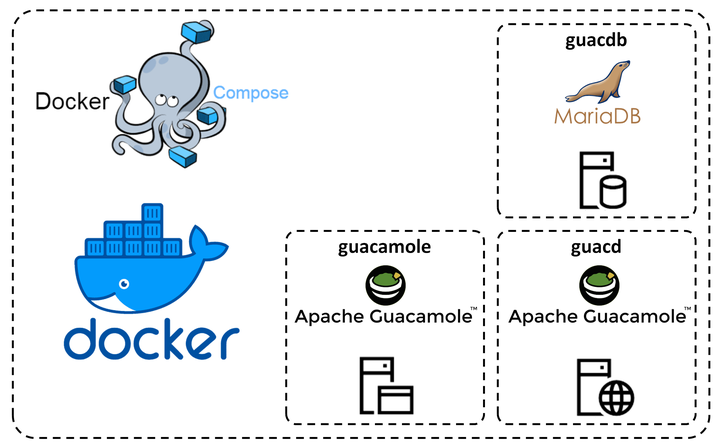
6. Install Apache Guacamole
Download official images:
sudo docker pull guacamole/guacamole
sudo docker pull guacamole/guacd
sudo docker pull mariadb/server

sudo docker info
sudo ls -la /var/lib/docker
Create the database initialization script:
mkdir $HOME/quac_install                           # make a directory inside $HOME (aka /home/<your-username>/)
cd $HOME/quac_install

sudo docker run --rm guacamole/guacamole /opt/guacamole/bin/initdb.sh --mysql > guac_db.sql
Create initial db docker-compose.yaml:
version: '3'
services:

  guacdb:
    container_name: guacdb
    image: mariadb/server:latest
    restart: unless-stopped
    environment:
      MYSQL_ROOT_PASSWORD: 'MariaDBRootPSW'
      MYSQL_DATABASE: 'guacamole_db'
      MYSQL_USER: 'guacamole_user'
      MYSQL_PASSWORD: 'MariaDBUserPSW'
    volumes:
      - 'guacdb-data:/var/lib/mysql'

volumes:
  guacdb-data:
Bringing the db container up:
sudo docker compose up -d
Copy the db initialization script into the container:
sudo docker cp guac_db.sql guacdb:/guac_db.sql
Open a shell and initialize the db:
sudo docker exec -it guacdb bash
cat /guac_db.sql | mysql -u root -p guacamole_db        # will ask to set password
exit
Shut down db container:
sudo docker compose down
Expand the docker-compose.yaml:
version: '3'
services:

  guacdb:
    container_name: guacdb
    image: mariadb/server:latest
    restart: unless-stopped
    environment:
      MYSQL_ROOT_PASSWORD: 'MariaDBRootPSW'
      MYSQL_DATABASE: 'guacamole_db'
      MYSQL_USER: 'guacamole_user'
      MYSQL_PASSWORD: 'MariaDBUserPSW'
    volumes:
      - 'guacdb-data:/var/lib/mysql'

  guacd:
    container_name: guacd
    image: guacamole/guacd
    restart: unless-stopped

  guacamole:
    container_name: guacamole
    image: 'guacamole/guacamole:latest'
    restart: unless-stopped
    ports:
      - '8080:8080'
    environment:
      GUACD_HOSTNAME: "guacd"
      MYSQL_HOSTNAME: "guacdb"
      MYSQL_DATABASE: "guacamole_db"
      MYSQL_USER: "guacamole_user"
      MYSQL_PASSWORD: "MariaDBUserPSW"
      TOTP_ENABLED: "true"
    depends_on:
      - guacdb
      - guacd

volumes:
  guacdb-data:
Bringing everything up again:
sudo docker compose up -d
Find container IP address:
sudo docker ps -a                                               # find container id
sudo docker inspect <container id> | grep "IPAddress"           # find container ip address
Log in:
Browse to “http://my.docker.ip.address:8080/guacamole” (e.g. http://172.20.0.4:8080/guacamole/) and login with:
user: guacadmin
password: guacadmin
7. Guac administration and VNC connection setup
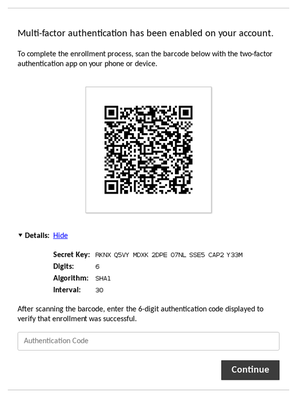
The first time you log in (with every account, if you keep the “TOTP key confirmed” setting for additional accounts you create) you will be presented with a secret key in the form of a QR code (and also, for your convenience, a 32 alphanumeric secret key).Read more on TOTP from the Guacamole documentation.
Important note: The secret keys are generated only first time you log in so it is important to store them safely. Most 2FA Auth smartphone apps (like the Google Authenticator I use) do not have ways to backup the secret keys. My advice is to take a photo of the QR code so you can always recuperate the secret key. This may important only for the Admin account, as the Admin may reset secrets of other accounts, delete them or create new accounts.
1. Create Admin user and delete guacadmin
For the guacadmin default account storing the QR code is not important as the first thing you should do after loging in is to: create a Admin account (enable all Permissions), log out, log in as the new Admin account and delete the guacadmin default account.

Don’t forget to use TOTP for Admin account and to store the QR somewhere safe.
2. Create normal user (vncuser)
We will now create a normal user named vncuser (same name we set for our Ubuntu user) that has only one privilege: create own password.
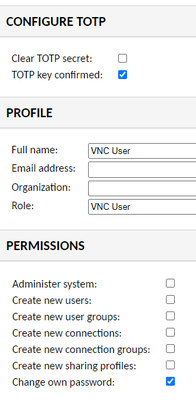
Don’t forget to use TOTP for this account as well.
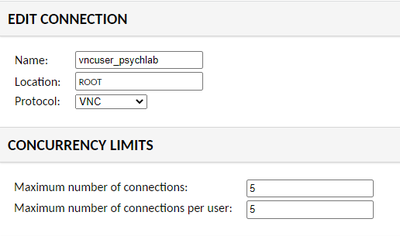
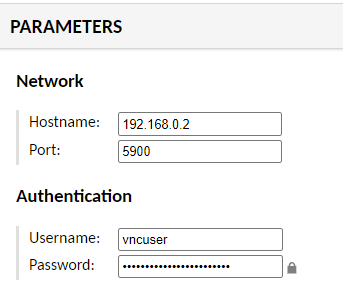
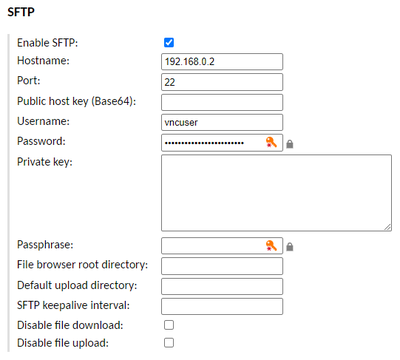
3. Create VNC connection with SFTP enabled
Guacamole’s VNC support also accepts the following features:
I will be only using SFTP for file transfers here. My VNC connection is setup like this:
Both for clipboard text copy-paste and drag-and-drop file transfer use the Guacamole in-browser menu by pressing CTRL + SHIFT + ALT. See more info about this menu on the official documentation.