HomeLab 4: Install and configure Nginx Proxy Manager with SSL Wildcard Certs
1. Forward HTTPS traffic to Ubuntu machine
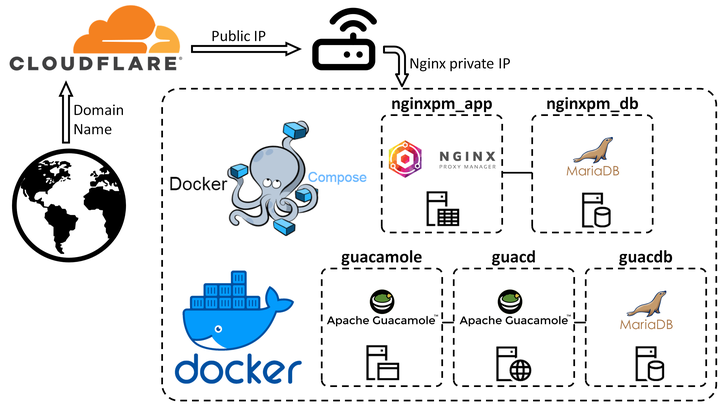
First we need to redirecting the communication addressed to the public
IP address to the static IP of our host Ubuntu machine. In my case, that
address is the 192.168.0.2 we set in my previous Home Lab 3 blog
post.
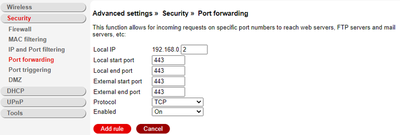
Setting up port forwarding is straightforward. You would have to connect your machine to your network, log in to the router, navigate to settings and under port forwarding. You should specify the specific port you want to forward to your device. As long as the port is open, your internet connection is working, and your machine is connected to the network, you will be able to access it from anywhere outside your home network. TCP port 443 is the standard TCP port used for a website which uses SSL. We will forward all 443 traffic.
2. Install Nginx Proxy Manager
Follow the official set up. You can watch video walkthrough from The Digital Life that goes over how to use Nginx Proxy Manager with Cloudflare for SSL wildcard certificates (like I will be doing here).
Create the docker-compose.yaml:
version: "3"
services:
  app:
    image: 'jc21/nginx-proxy-manager:latest'
    restart: unless-stopped
    ports:
      # These ports are in format <host-port>:<container-port>
      - '80:80' # Public HTTP Port
      - '443:443' # Public HTTPS Port
      - '81:81' # Admin Web Port
      # Add any other Stream port you want to expose
      # - '21:21' # FTP
    environment:
      DB_MYSQL_HOST: "db"
      DB_MYSQL_PORT: 3306
      DB_MYSQL_USER: "npm"
      DB_MYSQL_PASSWORD: "npm"
      DB_MYSQL_NAME: "npm"
      # Uncomment this if IPv6 is not enabled on your host
      # DISABLE_IPV6: 'true'
    volumes:
      - ./data:/data
      - ./letsencrypt:/etc/letsencrypt
    depends_on:
      - db

  db:
    image: 'jc21/mariadb-aria:latest'
    restart: unless-stopped
    environment:
      MYSQL_ROOT_PASSWORD: 'npm'
      MYSQL_DATABASE: 'npm'
      MYSQL_USER: 'npm'
      MYSQL_PASSWORD: 'npm'
    volumes:
      - ./data/mysql:/var/lib/mysql
Bringing the container up:
sudo docker compose up -d
3. Configure Nginx Proxy Manager
1. Login with default Administrator and change it
Go to http://ipaddress:81 (e.g. for me it’s
http://http://192.168.0.2:81)
Default Administrator user:
Email: admin@example.com{.email}
Password: changeme
Change the Administrator user and password.
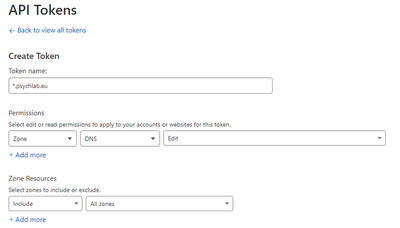
2. Get API token from Cloudflare dashbard
You will use this token for DNS Challenge in Nginx Proxy Manager configuration.
(1) Get your API toke > API tokens > Create API token > Edit zone DNS
(2) Give it a name (e.g. Toke name: *.psychlab.eu), set a Zone (e.g.
All zones)
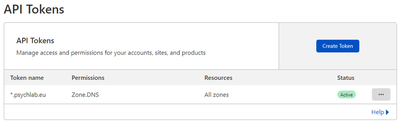
(3) Then click Create Token, copy the token and store it somewhere safe
(4) Important: during the DNS Challenge when setting up SSL certs you
should set “DNS only” in Cloudflare dashbabard DNS > Proxy Status.
If you are on your dashboard, might as well set “DNS only” for TLD
(e.g. psychlab.eu) and wildcard (*) now, but don’t forget after
DNS Challenge to switch back to “Proxied”.
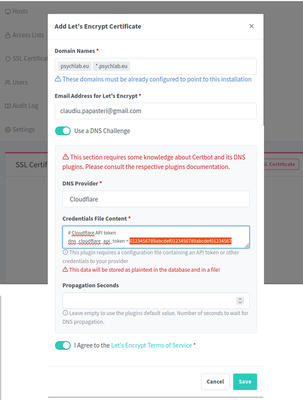
3. SSL Certificates
Login to Nginx Proxy Manager through Administrator account:
SSL Certificates > Add Certificate
- Domain Names: *.psychlab.eu, psychlab.eu
- Email Address for Let’s Encrypt: put your email address
- Use DNS Challenge
- DNS Provider: Cloudflare
- Credentials File Content: put here the Cloudflare API token after
dns_cloudflare_api_token = - Agree to the Let’s Encrypt Terms of Service
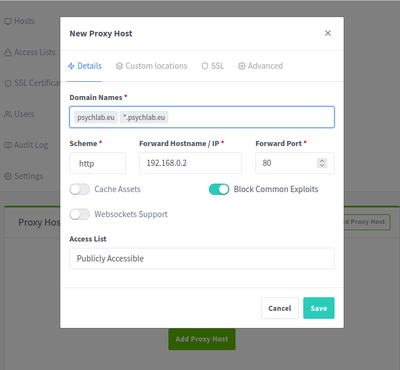
4. Add Proxy Host
Hosts > Add Proxy Host
Details
- Domain Names: *.psychlab.eu, psychlab.eu
- Scheme: http - IP: 192.168.0.2
- Port: 80
- Cache Assets: disabled
- Block Common Exploits: enabled
- Websockets Support: disabled
- Access List: Publicly Accessible
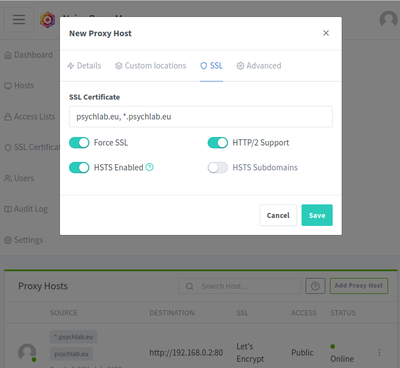
SSL
- SSL Certificate: *.psychlab.eu, psychlab.eu
- Force SSL
- HTTP/2 Support
- HSTS Enabled
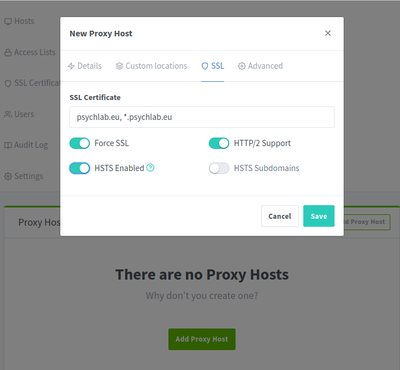
Custom Locations
- (nothing)
Advanced
- (nothing)
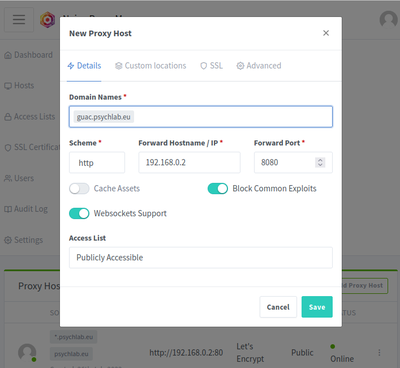
5. E.g. add Proxy Host for Guacamole
Hosts > Add Proxy Host
Details
- Domain Names: guac.psychlab.eu
- Scheme: http
- IP: 192.168.0.2
- Port: 8080
- Cache Assets: disabled
- Block Common Exploits: enabled
- Websockets Support: enabled
- Access List: Publicly Accessible
SSL
- SSL Certificate: *.psychlab.eu, psychlab.eu
- Force SSL: enabled
- HSTS Enabled: enabled
- HTTP/2 Support: enabled
- HSTS Subdomains: disabled
Custom Locations
- (nothing)
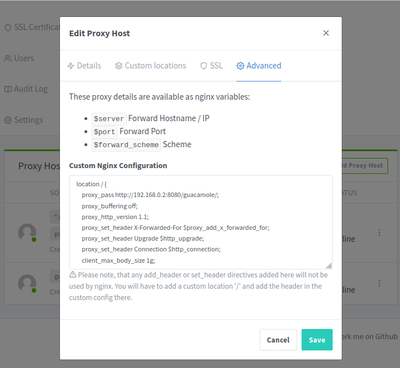
Advanced: paste in the following
location / {
    proxy_pass http://192.168.0.2:8080/guacamole/;
    proxy_buffering off;
    proxy_http_version 1.1;
    proxy_set_header X-Forwarded-For $proxy_add_x_forwarded_for;
    proxy_set_header Upgrade $http_upgrade;
    proxy_set_header Connection $http_connection;
    client_max_body_size 1g;
    proxy_cookie_path /guacamole/ /;
    access_log off;
}
As I outlined in Home Lab 3 blog
post,
the static IP address in my network for my Ubuntu machine is
192.168.0.2 and guacamole is accessible through
http://192.168.0.2:8080/guacamole/.
When proxying Guacamole through Nginx, you may run into issues with the
default limitations that Nginx places on file uploads (1MB), but
client_max_body_size parameter can be set within the location block to
configure the maximum file upload size.
4. Firewall
sudo apt update

# Basic ufw lockdown
sudo ufw default allow outgoing

sudo ufw default deny incoming

# Allow inbound ports:
sudo ufw allow ssh

sudo ufw allow http/tcp

sudo ufw allow https/tcp

sudo ufw allow 81/tcp

# iptables -L