HomeLab 5: Docker install LimeSurvey and plugins, reverse proxy with Nginxpm and automate database backups

Reason
We needed to self-host a production ready survey solution. LimeSurvey is the number one open-source survey software with many advanced features for customized survey-creation.
Here we will install LimeSurvey through Docker, install a 2FA plugin for added security (we will use admin TOTP login), configure Nginx Proxy Manager reverse proxy and automate container database backups.
1. Install Docker and Docker Compose
I provide a walkthrough on this in my HomeLab 3 blog post.
2. If you have LimeSurvey installed and are fixing/updating:
Be sure to backup the database and the security.php used for encryption.
An example is provided by adamzammit:
# assuming the container name is 'some-limesurvey', backup the security.php:
# sudo docker cp some-limesurvey:/var/www/html/application/config/security.php /tmp/security.php

# then update LimeSurvey and then copy the security.php file back:
# sudo docker cp /tmp/security.php some-limesurvey:/var/www/html/application/config/security.php
3. Bring LimeSurvey container up
I will be using adamzammit’s LimeSurvey docker image that is well maintained and is production ready.
Download images:
sudo apt update

sudo docker pull acspri/limesurvey:latest
sudo docker pull mariadb/server:latest
Make a directory for the Docker Compose file:
mkdir $HOME/Installs/limesurvey                           # make a directory inside $HOME (aka /home/<your-username>/)
cd $HOME/Installs/limesurvey
docker-compose.yaml:
version: '3'

services:

  limesurvey:
    image: acspri/limesurvey:latest
    restart: unless-stopped
    ports:
      - 8082:80
    environment:
      LIMESURVEY_DB_PASSWORD: example
      LIMESURVEY_ADMIN_USER: admin
      LIMESURVEY_ADMIN_PASSWORD: password
      LIMESURVEY_ADMIN_NAME: Lime Administrator
      LIMESURVEY_ADMIN_EMAIL: lime@lime.lime
    volumes:
      # Installed LimeSurvey plugins
      - ./plugins:/var/www/html/plugins
      # New or created themes, Survey resources, Data from uploaded responses
      - ./upload:/var/www/html/upload
      # Configuration and security.php for encrypted responses
      - ./config:/var/www/html/application/config

  mysql:
    image: mariadb/server:latest
    restart: unless-stopped
    environment:
      MYSQL_ROOT_PASSWORD: example
Bring the container up:
sudo docker compose up -d
Wait for it to initialize completely!
4. Configuration
Visit http://localhost:8082 or http://host-ip:8082 (for me it’s 192.168.0.2:8082).
Go to http://localhost:8082/admin or http://host-ip:8082/admin and change default Administrator user and password.
Default Administrator:
- user: admin
- password: password
More on settings in the LimeSurvey manual.
5. Add 2FA plugin
Most plugins need only to be copied and unzipped in the corresponding folder. Here we will install the TwoFactorAdminLogin so we can have TOTP for the Admin accounts for added security. You can find more on this plugin in the manual and from LimeStore where you can also download it from. For ease of use, I uploaded it unzipped in my GitHub account and will download it from there.
# plugins should be placed in the volume defined in docker compose ./var/www/html/plugins

cd $HOME/Installs/limesurvey/plugins
sudo wget https://github.com/ClaudiuPapasteri/LimeSurvey-plugins/blob/main/TwoFactorAdminLogin
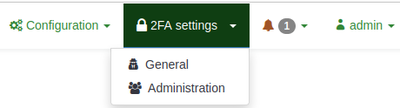
Now login as Administrator, go to Plugins and activate the plugin.

Change the settings if necesary (I kept defaults). More info on the official LimeStore docs
After, scan the QR code (remember to take a photo and keep it safe) and put in the code.
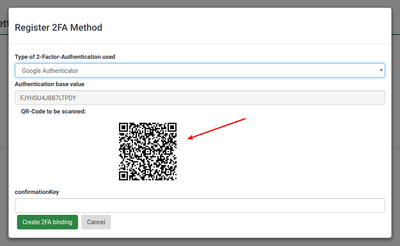
Each time you login in from now on you will use the 2FA code generated by your preffered app (I use Google Authenticator).
6. Reverse Proxy LimeSurvey
As outline in previous posts, I use Nginx Proxy Manager for reverse proxying. To add a Proxy Host, connect to the Administrator user of Nginxpm and do the following:
Hosts > Add Proxy Host
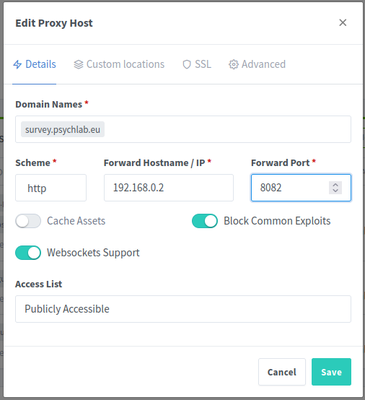
Details
- Domain Names: survey.psychlab.eu
- Scheme: http
- IP: 192.168.0.2
- Port: 8082
- Cache Assets: disabled
- Block Common Exploits: enabled
- Websockets Support: enabled
- Access List: Publicly Accessible
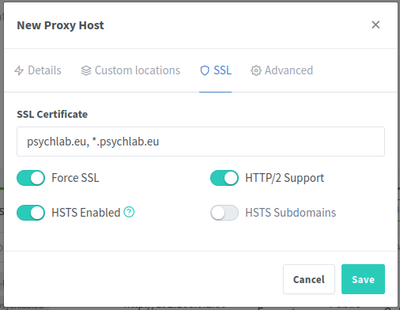
- SSL
- SSL Certificate: *.psychlab.eu, psychlab.eu
- Force SSL: enabled
- HSTS Enabled: enabled
- HTTP/2 Support: enabled
- HSTS Subdomains: disabled
Custom Locations
- (nothing)
Advanced
- (nothing)
If all went well you can acces LimeSurvey by going to your subdomain (in my case its survey.psychlab.eu).
7. Automate container database backups
Download xcad2k’s bash script
I have forked it, modified it and hosted it on my Github. The script stores dumps of the container mysql/mariadb in the defined path and keeps them for 3 days before deleting them.
cd $HOME/scripts                                                         # for me this is home/claudiu/scripts

sudo git clone https://github.com/ClaudiuPapasteri/db-container-backup.git    # get my modified db-container-backup.sh
cd db-container-backup
sudo rm -r db-container-backup                                                # this directory has the original scripts, we don't need them

sudo chmod +x db-container-backup.sh                                          # to make sure bash script is executable

# make directory where the backups should be stored
cd $HOME
sudo mkdir db_backups
# sudo chown -R $USER: $HOME                                           # if you dont have permission over the two created folders, run this to own your home dir

# set the path to where the backups should be stored
nano db-container-backup.sh                                              # addapt cloudflare.sh

# execute script
./db-container-backup.sh                             # execute script in a subshell
# sed -i -e 's/\r$//' db-container-backup.sh         # if you get bad interpreter error, run this command and execute again
Automate the backup task with Cron Job
Get permissions to run Docker without sudo. This will let the bash script run docker comands. For more info see the official docs.
sudo groupadd docker                           # create the docker group.
sudo usermod -aG docker $USER                  # add your user to the docker group.
getent group docker                            # check that you are member of the group

sudo chown root:docker /var/run/docker.sock    # change group ownership of the docker.sock file
sudo chmod root:docker /var/run/docker.sock    # provide read write permission to docker.sock file

# test by running a docker command
# docker ps
Set Cron Job for the bash script.
sudo crontab -l                               # list root cron jobs
sudo crontab -e                               # sudo is important here because we want to define the user-specific crontab for root
# pick text editor (press 1 for nano)
# edit so that bash script is ran every day at 4:00AM and 5 minutes after every system startup:
# @reboot sleep 300 && /bin/bash /home/claudiu/scripts/db-container-backup/db-container-backup.sh
# 0 4 * * * /bin/bash /home/claudiu/scripts/db-container-backup/db-container-backup.sh
# save and exit

sudo crontab -l                               # check that changes were made
sudo systemctl restart cron                   # cron needs not be restarted whenever a crontab file is modified
sudo systemctl status cron                    # check that the task has been run successfuly